


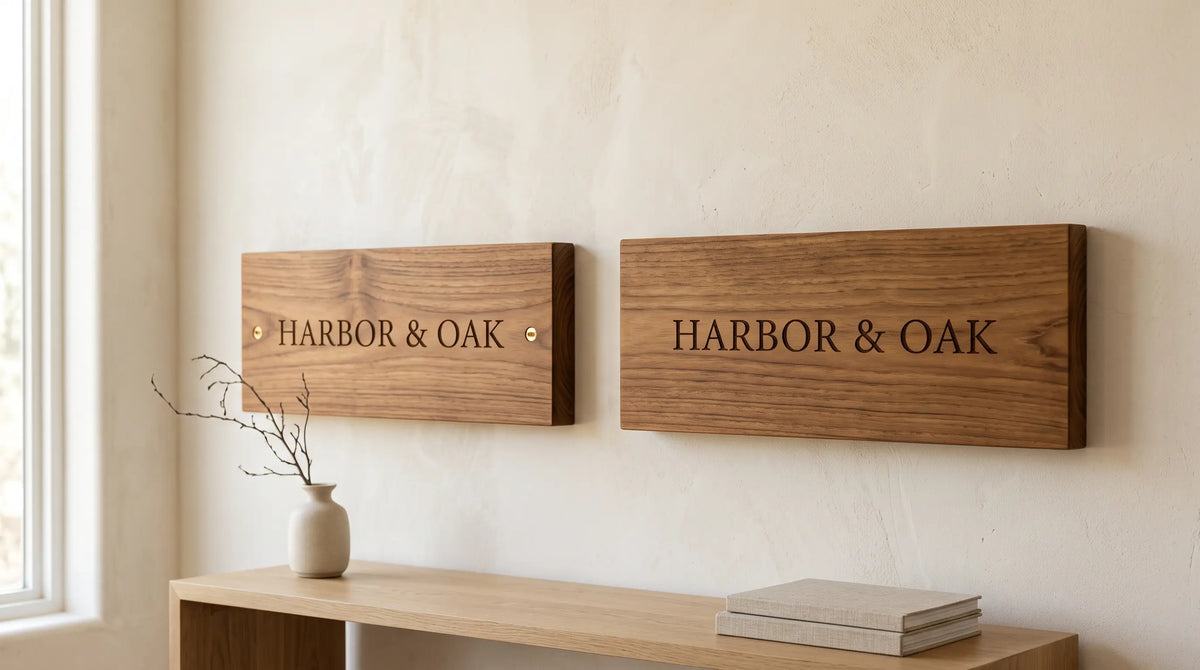
Mounting a wooden sign correctly is just as important as choosing the right size and design. The best method depends on the sign weight, wall material, mounting hardware and whether you want the screws to remain visible or hidden. This guide explains the difference between visible screw mounting and hidden mounting, how to prepare the wall, and how to install a wooden sign so it sits straight and secure.
What Is the Best Way to Hang a Wooden Sign?
For many solid wood signs, the best mounting method is either a direct screw fixing or a concealed rear hanging system. Visible screws are simple, strong and easy to inspect. Hidden mounting keeps the front face clean because the fixing hardware sits behind the sign.
Choose the mounting method after considering the sign's weight, width, wall material and final appearance. A mounting system should never be selected on appearance alone.
If you are still deciding on the sign dimensions, start with our custom wood sign size guide. Size, thickness and mounting method are easier to plan together than separately.
What Should You Check Before Mounting a Wooden Sign?
Before drilling the wall or the sign, confirm exactly what you are mounting and what it is being mounted to. A small teak nameplate and a large solid-wood business sign may require completely different fixing hardware even if both use the same general mounting style.
The wall itself matters as much as the sign. Drywall, a wooden stud, brick, concrete and solid timber walls use different fasteners. Always choose screws and anchors that are suitable for the actual wall material and rated for the load they will carry.
Visible Screw Mounting: Simple and Direct
Visible screw mounting fixes the sign directly through prepared mounting points in the front face. For a rectangular sign, a common layout is one fixing near the left side and one near the right side. Once installed, the screw heads remain visible.
This method can suit modern, rustic and architectural signs where the visible hardware becomes part of the design. It also makes the fixing points easy to inspect and access later.
- Direct mechanical fixing
- Simple mounting concept
- Easy to inspect after installation
- Works well with intentional hardware details
- Can help prevent a wide sign from rotating
- Screw heads remain visible
- Hole placement must be accurate
- Hardware style affects the final look
- Over-tightening can damage the wood or finish
- The wall still requires the correct anchor
Do not use the screw to force the sign flat against an uneven wall. Tighten only as required for a secure installation, and use hardware appropriate for both the sign and wall.

Hidden Mounting: A Cleaner Front Face
Hidden mounting places the hanging hardware behind the wooden sign, leaving the front face free from visible screws. One simple concealed method uses a screw installed into the wall with the screw head left slightly proud of the surface. A matching slot or hanger on the back of the sign then sits securely over the screw head.
This works in a similar way to hanging a picture frame: the threaded portion of the screw is secured into the wall or suitable anchor, while the head remains exposed just enough for the rear hanger to engage.
Use a screw, anchor or fixing that matches the wall construction and the weight of the sign.
Do not drive the head completely flush if the rear hanger needs space to hook over it.
Position the slot or hanging point on the back of the sign directly over the screw head.
Allow the hanger to engage fully, then gently check that the sign is seated correctly and does not lift off easily.
A concealed rear hanger is useful when you want the engraving, wood grain and overall shape to remain the focus. Wider or heavier signs may require two hidden fixing points or a different mounting system rather than a single central hanger.
Wood Ceylon's custom engraved wooden QR code sign can be ordered with a wall-mount option, making it suitable for entryways, business walls and other locations where a tabletop stand is not preferred.

Visible Screws vs Hidden Mounting
Neither method is automatically better. The right choice depends on the look you want and how the sign needs to be supported.
| Feature | Visible Screws | Hidden Mounting |
|---|---|---|
| Front appearance | Hardware remains visible | Clean front face |
| Installation concept | Direct and easy to understand | Requires rear hanger alignment |
| Hardware access | Easy to inspect | Mostly concealed after hanging |
| Minimal interiors | Can work with matching hardware | Usually more discreet |
| Wide signs | Two fixing points can resist rotation | May need two concealed points |
| Removal | Unscrew the front fixings | Often lifts off the rear hanger |
If your priority is a minimal appearance, hidden mounting is usually the more discreet choice. If you prefer a simple mechanical fixing and do not mind seeing the hardware, visible screws can be an excellent solution.
Choose the Mounting Hardware for the Wall Type
The same wooden sign can require different hardware depending on where it is installed. Do not assume that a screw suitable for a timber stud will also work correctly in hollow drywall or masonry.
| Wall Type | Typical Approach | Important Check |
|---|---|---|
| Wood / timber | Suitable wood screw into sound timber | Confirm the timber is solid and thick enough |
| Drywall with stud | Screw into the structural stud where possible | Locate the stud accurately |
| Drywall without stud | Use a properly rated drywall anchor | Match the anchor to the sign load |
| Brick or concrete | Masonry-compatible plug or anchor | Use the correct drill bit and fastener system |
| Tile | Tile-compatible drilling and suitable wall anchor behind it | Avoid cracking the tile and confirm what is behind it |
Before drilling, make sure you are not drilling into concealed electrical wiring, plumbing or other services. If the wall construction is uncertain or the sign is unusually heavy, use a qualified installer.

How to Mount a Wooden Sign Step by Step
The exact hardware may vary, but the preparation process is similar for most wall-mounted wooden signs.
Hold the sign against the wall or use a paper template to test the height and surrounding space before making holes.
Use a tape measure and pencil. For two fixings, transfer the exact center-to-center distance between the mounting points.
Do not rely on the ceiling, door frame or furniture line as your only reference. Confirm the drilling marks with a level.
Drill and install the correct anchor or fixing according to the hardware instructions and wall type.
Secure visible screws evenly, or place the hidden rear hanger over the prepared screw head or concealed mounting points.
Place the level along the top edge and make any small adjustment allowed by the mounting system.
How High Should You Mount a Wooden Sign?
There is no single height that works for every sign. The ideal position depends on whether the sign is being read from across a room, beside a door, above furniture or at close range near a reception counter.
For an open wall, use comfortable eye level as a starting point and then adjust for the room. For a sign above a console, reception desk or other furniture, treat the sign and furniture as one visual arrangement rather than positioning the sign independently.
Cut a paper template to the same size as the finished sign and tape it to the wall. Check it from the normal viewing position before drilling. This is especially useful for custom signs because moving paper is much easier than repairing misplaced holes.
Need help deciding the dimensions before mounting? See the custom wood sign size guide for practical sizing ideas for doors, entryways, business walls and reception spaces.

Common Wooden Sign Mounting Mistakes
- Choosing hardware before checking the wall type
- Guessing the mounting position without measuring
- Using one fixing point for a wide sign that tends to rotate
- Over-tightening screws against the wood surface
- Using anchors without checking their load rating
- Drilling before checking for hidden services
- Skipping the final level check
- Identify the wall construction first
- Confirm sign dimensions and approximate weight
- Use a paper template before drilling
- Transfer mounting points accurately
- Match the hardware to the wall and load
- Keep the sign level during installation
- Re-check stability after mounting
For personalized teak signs and engraved pieces, browse the Wood Ceylon personalized wood collection. Custom sizing and engraving options can help the sign fit a specific wall, door, counter or business interior.
Visible or Hidden Mounting: Which Should You Choose?
Choose visible screws if you want a straightforward fixing method and are comfortable with the hardware being part of the finished look. Choose hidden mounting when you want an uninterrupted wooden front face and a cleaner, more minimal appearance.
Whichever style you choose, the most important part is matching the hardware to the sign and the wall. Accurate measurement, correct anchors and careful alignment will make more difference to the finished installation than the mounting style alone.
Frequently Asked Questions
How do you hang a wooden sign without visible screws?
Use a concealed rear hanger, keyhole-style slot or another hidden mounting system designed for the sign. A wall screw can be installed with its head slightly exposed so the rear hanger hooks securely over it. The exact hardware should be matched to the sign weight and wall type.
Can I hang a wooden sign using one screw?
A single hidden fixing can work for some compact signs that are specifically designed for one-point hanging. Wider or heavier signs may rotate or require additional support, so two mounting points or another system may be more appropriate.
Are visible screws better for heavy wood signs?
Visible screws can provide a direct mechanical fixing, but whether they are suitable depends on the sign construction, screw size, wall material and anchors. A heavy sign may require more robust hardware or professional installation regardless of whether the fixings are visible.
How do I keep a wooden sign level?
Measure the mounting points accurately and check them with a level before drilling. Wider signs usually stay more stable when they have two properly aligned fixing points instead of a single central point.
Can I mount a wood sign on drywall?
Yes. Where possible, fix into a structural stud. If the mounting point does not align with a stud, use an appropriate drywall anchor rated for the sign and follow the anchor manufacturer's installation instructions.
Can a wooden sign be mounted on brick or concrete?
Yes, but masonry requires compatible drilling equipment, plugs or anchors and screws. The hardware should be selected for the specific masonry surface and sign load.
Should I pre-drill holes in a wooden sign?
If the mounting method requires screws through the sign, a correctly sized pilot hole can help reduce the risk of splitting and improve screw placement. Follow the hardware and maker's instructions for the specific sign.
What is the cleanest mounting option for an engraved wood sign?
A concealed rear mounting system generally gives the cleanest front appearance because no screw heads are visible. This keeps attention on the engraving and natural wood grain.
How do I choose between visible and hidden mounting?
Choose based on appearance, sign size, weight, wall construction and how often the sign may need to be removed. Visible screws provide easy access to the fixing points, while hidden mounting creates a more minimal look.



Leave a comment